
Why Make Concrete Moisture Testing Complicated (When It’s Not)?
Some people choose to skip moisture testing in concrete floor slabs because they think it’s going to be way too complicated. Or maybe they’re trying to meet a tight construction schedule, and they’re concerned that testing for moisture could be time-consuming and lead to unacceptable delays.
Fortunately, testing moisture in concrete is neither hard to do, nor does it take much time. Plus, when you’re getting ready for a floor installation, it’s never a smart move to consider moisture testing as something you can just skip.
Why you want to say “Yes” to concrete moisture testing
Never skip concrete moisture testing because that could put you at risk for a significant flooring failure.
For one thing, concrete can fool you into thinking it’s dry when it’s not. Even when the surface looks perfectly dry, a concrete slab can contain a surprising amount of moisture—after all, its three main ingredients are water, cement, and aggregate. Concrete requires water in the mix for it to cure properly and attain the strength, durability, and hardness that you want.
Concrete’s drying process occurs by evaporation from the surface. This means it doesn’t take all that long for the surface of the concrete to seem dry.
However, the “inside story” deeper down in the concrete is likely quite different. Typically, a moisture gradient forms as concrete dries, with significantly more moisture deep within the slab than at the surface—moisture that will come back to attack your floor or adhesive.
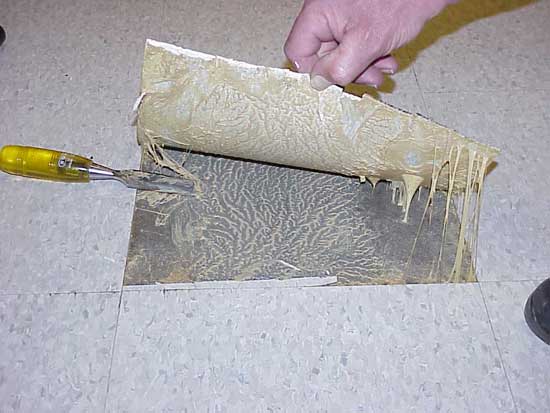
Without an accurate picture of the concrete’s overall moisture condition, you could be at risk for an unpleasant surprise after the floor is installed. Serious moisture-related issues such as buckling, crowning, cupping, cracking, mold, or mildew might rear their ugly head down the road.
Not a pretty picture. And quite unnecessary if you take the proper precautions. The fact is, assessing the moisture condition of a concrete slab is much easier and faster than you might think.
The first step is to choose the right concrete moisture test
This step is critical, and it’s also easy to get right. Realize that only one concrete moisture test method is scientifically proven for accuracy and reliability: the in-situ relative humidity (RH) test, standardized as ASTM F2170. It’s based on scientific studies from Lund University in Sweden, and these studies demonstrated the importance of taking RH measurements at a specific depth within the slab.
And that’s exactly what you want—a scientifically proven, accurate test. Otherwise, surface-based moisture tests, such as the anhydrous calcium chloride test, often yield misleading or unreliable results and put you at risk for a possible flooring failure.
The good news is the RH moisture test also happens to be faster and more economical to perform than other test methods. You’ll be able to obtain test results in just 24 hours. And if the RH readings show the concrete is ready for your finished floor product, you can begin installing right away.
The next step is to obtain the right tools for easy moisture testing
Armed with the knowledge that the RH test is the right concrete moisture test for getting reliable results, your next step is to obtain the tools you need to conduct the test accurately and easily. Several manufacturers have made this step quite simple. They offer RH test kits that include the RH sensors, a reader or data recording device, sleeves that encase and protect the RH sensors when they’re placed in the concrete, and other basic tools for making the RH test fast and easy to perform.
Wagner Meters offers the popular Concrete Moisture Test Starter Kit+ with Rapid RH® L6; the perfect way to get up and running with highly accurate RH concrete moisture testing. The L6 sensors in the kit come with a NIST-traceable certificate of calibration, so they’re ready to be used straight from the box. And unlike RH sensors from other manufacturers, the L6 sensors never need recalibration.
The Rapid RH L6 system also simplifies things by giving you digitized data that can be sent wirelessly to your smartphone. There’s even a free app available, the DataMaster™ L6 app, that eliminates tedious, time-consuming paperwork associated with reading, recording, and reporting data. With the L6 system, everything is practically automatic and effortless.
How does the RH test work?
ASTM F2170 is the standard providing specific guidelines for how the RH test should be performed. In a nutshell, there are just a few basic steps. First, drill holes in the concrete for placement of the sensors at a specific depth (40% of the slab’s overall thickness for a slab drying from one side, or 20% for a slab drying from two sides).
ASTM guidelines dictate that you must drill three test holes for the first 1000 square feet and one hole for each additional 1000 square feet. So, for a 10,000-square-foot slab, you would drill 12 test holes for placing the sensors.
Next, per ASTM guidelines, simply wait 24 hours for the test holes to equilibrate, and then return to get your RH readings. With the Rapid RH L6 system, obtaining readings is super easy. The Starter Kit+ includes the Total Reader®—a Bluetooth® device that reads and transmits RH test data directly to your smart device—that gives you 100 percent data integrity.
What about understanding your test results? Or determining the correct course of action? How can you know if your RH readings are giving you the green light to install the finished floor?
How to interpret your RH data
Even the step of interpreting your RH data is quite easy. Nearly all flooring product manufacturers recognize the importance of getting accurate moisture data using the RH test method, and they provide an RH specification for each of their products. The spec is a number that you simply compare with your RH readings.
For example, if the manufacturer’s spec is listed as 95 percent, then your most recent RH readings must be below this number before you can consider it safe to install the flooring product over the concrete.
Where do you find the manufacturer’s spec? Either contact the manufacturer directly, or if you prefer, download this handy mobile app which gives you the RH specs for flooring products from over 120 major manufacturers right at your fingertips. What could be simpler?
What if the RH readings are higher than the manufacturer’s spec?
First, be thankful that you were wise enough to test for moisture before your installation. Otherwise, you might have been headed straight for a flooring disaster.
Next, be patient and wait for the concrete to dry enough to reach the manufacturer’s spec. Then, check to be sure you’ve got optimal conditions for drying. For example, is the building fully enclosed with all windows installed? Is the HVAC turned and set for giving you the building’s service conditions? Are you 100 percent sure there’s an intact vapor barrier installed under the slab? (Without one, the concrete may never dry, and a moisture mitigation product may be needed for sealing the slab.)
What if the project timeline dictates not waiting the amount of time it will take for the concrete to dry sufficiently? You still have choices, such as considering a different flooring product with a higher tolerance for moisture.
Build the drying process into your project planning
It’s always best to look ahead and take into account the concrete’s expected drying time when putting together your project schedule. As a rule of thumb, allow approximately one month of drying for each inch of slab thickness, although actual drying times will vary depending on conditions.
Equally important, always insist on an accurate, reliable concrete moisture test before your flooring installation. Remember, by using the Rapid RH L6 test kit, you can rest assured that concrete moisture testing won’t be complicated or time-consuming. Plus, you’ll have the vital data you need for preventing a moisture-related disaster.
For more information about how simple concrete moisture testing can be with the Rapid RH L6 test system, give us a call today at (800) 933-3506.
Jason has 20+ years’ experience in sales and sales management in a spectrum of industries and has successfully launched a variety of products to the market, including the original Rapid RH® concrete moisture tests. He currently works with Wagner Meters as our Rapid RH® product sales manager.
Related Posts via Taxonomies
Last updated on January 31st, 2022